Samstag, 20. November 2010
Samstag, 13. November 2010
Manga Talente 2011

Mein diesjähriger Beitrag für Manga Talente 2011. Die Druckversion ist ein bisschen unten angeschnitten^^
Montag, 11. Oktober 2010


Donnerstag, 2. September 2010
Meidocafe. Nani Mai Hunni?
Feelin´ nostalgic man o.o
Ich hätte zu gerne mal den Podcast gehört. Gibt´s eigentlich noch irgendwelche Lebenszeichen von Melonpan?

Ich hätte zu gerne mal den Podcast gehört. Gibt´s eigentlich noch irgendwelche Lebenszeichen von Melonpan?

Merkzettel!
Things i have to do(neue Kategorie in der Sidebar):
-playing Assassins Creed 2
-Playing Final Fantasy 13
-finishing Valkyria Chronicles
-watching King of Thorns
-buying Cintiq 21UX
-buying 2x4 GB RAM
-buying Intel Core2Duo E8600
-playing Mass Effect 1/2
-finishing Seminarfacharbeit
-finishing all games of Ace Attorney
-playing/watching Umineko no koro ni
-watching The Disappearance of Haruhi Suzumiya
Dienstag, 31. August 2010
Rip Satoshi Kon
Leider viel zu früh verstorben. Manche kennen ihn vielleicht vom Anime Tokyo Godfathers oder Paprika.
Dienstag, 10. August 2010

Freitag, 6. August 2010

Freitag, 23. Juli 2010
I dunno?!
Haus in Vietnam, gezeichnet ohne Referenz. Die Proportionen zwischen Figur und Haus sind nicht ganz richtig.^^ Over and out.


Donnerstag, 22. Juli 2010
onemanga.com RIP
Eine Scanlationseite für Mangas, bei der ich ab und zu Mangas gelesen habe, wird von den ganzen Mangapublishern(oder was auch immer) nicht mehr geduldet, und wird somit in ein paar Tagen offline gehen. Wie es bei anderen Scanlationseiten aussieht, weiß ich nicht.
Die einzige Mangaserie, die ich momentan verfolge, is Bakuman. :Q
Ich hoffe, dass es nicht irgendwann zu schwer sein wird, an Scanlations zu gelangen.
Die einzige Mangaserie, die ich momentan verfolge, is Bakuman. :Q
Ich hoffe, dass es nicht irgendwann zu schwer sein wird, an Scanlations zu gelangen.
Sonntag, 18. Juli 2010
More I dunno!
üben :>, bissl verkackt(habs imm Original nochmal bearbeitet)

haha, gelitten, rote Karte xD

Spiegel

Gothic Sports Fanart, Sitzposition von Mona Lisa


haha, gelitten, rote Karte xD

Spiegel

Gothic Sports Fanart, Sitzposition von Mona Lisa

Samstag, 17. Juli 2010


Dienstag, 11. Mai 2010

Samstag, 1. Mai 2010
Drawing #2324252
Neue Sketches^^
Character Design.

Einer von vielen Position-Abzeichnen-Photo-Studies. Dieses hat mir heut am meisten gefallen.^^ Dieser Kontrast!!♥


Character Design.

Einer von vielen Position-Abzeichnen-Photo-Studies. Dieses hat mir heut am meisten gefallen.^^ Dieser Kontrast!!♥


Montag, 12. April 2010
Making your own Anime

Habe heute ein interessantes Posting zum thema Anime-Produktion gefunden. Enjoy.
by terrydy
Yes, making animated short is kind of difficult, especially when working solo. All the things mentioned below are assumed that you have already finished the character design and have a ready-to-use color palette or swatches you can already use. I suggest using pencil, thin onion paper or animation paper, and a lightbox for tracing the artwork. This is normally a tradigital work flow. If you desire to do in this manner, then you should scan and feed the drawings into the computer frames by frames, mostly key frames. Also a automatic feed scanner is easier and faster to scan all those drawings. The in-betweens can be partially done or completely using digital methods. As for the background, you can either use traditional French Gouache or Acrylic paint and brush, and ink pen, and then scanning it into the computer at 300 dpi. Or you can directly work the background by digitally creating the layers and textures needed for each section of a background. Make sure the object that is painted has a transparent background and saved in .png file. Plan which texture and object layer will go where. (This can be done in Adobe Photoshop or Corel Painter with the correct brush settings respectively.) Then, importing into a 3D program such as Maya or Newtek Lightwave 3D, then create the 2D planes for the object layers(.png) or create simple volume of shapes to fit your need of the texture layers. Adjust the planes using XYZ axis to give the feel of depth. Then finally, render the background in a transparent file format with Photoshop layers for additional editing and reuse. Once it is rendered, the layers are preserved, and it is very easy to adjust the color of any layer to give the different time of the day effect. Also, save as a native 3D file as well, so you can replace old textures with new ones to fit the mood of certain factors, such as the weather changes from Sunny to Rainy and so on etc. As for the animation portion, if you like to use the tradigital method mentioned above, a graphics tablet is required as well to vector the scanned frames. But if you like a COMPLETELY DIGITAL WORK FLOW, you will probably be best off with a Wacom Cintiq 12″ which can handle nicely. If you got more cash, go for the 20″ or 21″, but I prefer 12″ which is more than enough to work with. Once you got the Cintiq, start sketching poses for the key frames with minimal details. Once you got enough keys for a scene, start to add details to each frames (this applies to tradigital method as well.) Once you finish all the key frames with all the details, you can start using onion skinning to draw in the in-betweens. Also automatic tweening in encouraged by me to give the overall animation a smooth transition between each in-betweens and the key frames. Next, we have the line testing[...]
Der Post geht noch weiter:
Source: http://www.hongfire.com/forum/showthread.php?t=140868&p=2180636
Freitag, 9. April 2010
Bleistiftzeichnung in Strichgraphik umwandeln
Das folgende Tutorial zeigt MEINE umgehensweise, eine eingescannte Bleistiftzeichnung in eine Strichgraphik in Photoshop umzuwandeln, um damit eventuell CGs zu erstellen. Die Begriffe beziehen sich auf die englische Version von Photoshop
Schritt 1: -Bild in Graustufen einscannen bei 300/600/1200 dpi, je höher desto besser
Schritt 2: -Bild in Photoshop öffnen, in Image->Mode und kontrollieren ob das Bild auf Grayscale ist
Schritt 3: -in Filter->Blur den gaussschen Weichzeichner/Blur auswählen und auf 0.5 stellen(die Bleistiftzeichnung sollte sehr sauber sein) und anwenden PS: dieser Schritt ist nicht unbedingt notwendig; ohne diesen können im Endprodukt kleinere Pixel entstehen, die sich überall auf dem Bild verteilen
Schritt 4: -Image->Adjustments->Curves , Einstellungen im Screen zu sehen

Schritt 5: -Image->Mode->Bitmap, die Auflösung kann so bleiben, bei Methode wählt ihr 50% Treshold(je weniger die %, desto mehr werden die Texturen beibehalten; habe allerdings noch keine Möglichkeit in Photoshop gefunden, die Werte zu ändern); in Illustrator geht es unter Object-> Live Trace-> Tracing Options
Schritt 6: -ist das Ergebnis gut, wechselt ihr den Modus wieder in Grayscale
Schritt 7: -wenn ihr das Bild nun colorieren wollt, den Modus in RGB umwandeln
Schritt 8: -Tee trinken^^
Samstag, 27. Februar 2010
Irisu Syndrome! Irisu is coming...
Das Spiel ist so toll!:3 Mal was anderes.
Wollte eigentlich noch was zur Story schreiben, vielleicht im nächsten Post.^^
Ich war ziemlich beeindruckt, wo ich "das" gesehen habe(schaut einfach das Video xD), weswegen ich das auch aufgenommen habe.^^
Hier gibt´s den Download-Link:
http://www.vector.co.jp/soft/win95/game/se463417.html
Spiel über http://zepy.momotato.com entdeckt (Kann beide Links komischerweise nicht fehlerfrei hyperlinken)
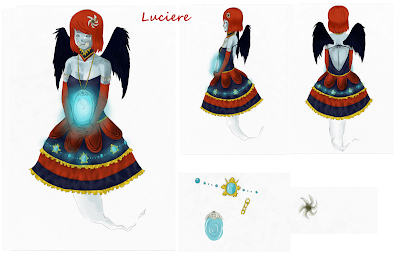
Dienstag, 23. Februar 2010
Luciere
Bin wieder heil von meiner Vietnam-Reise zurückgekommen und euch erwartet ein Monster-Design für Flyff.^^

Abonnieren
Posts (Atom)